Wednesday, January 20, 2016

Happy New Year

So, is it too late to celebrate the new year?  Nah... we're good.

To be honest, I found this in my drafts folder!  What the heck?!  You mean I have to hit the Publish button when I'm finished writing up a post?  Haha!

I was inspired by Julie Ebersole's card HERE and created a simple New Year's card with similar elements.


I started with a piece of cardstock that is a blush pink / peach color.  It was from a multi-pack that I received from a company that is no longer in business (my apologies, since I don't recall what it's name really is).

Overall, this was a super simple card, but the elements of gold are just amazing!  I adore the Delicata gold ink!


The images do not do any justice to the shimmer.  I embossed the champagne glasses in gold, colored with my R20 Copic marker, added clear Wink of Stella and fussy cut.  I covered with Glossy Accents and allowed to dry.  In most cases, I take the time to remove all the bubbles when I add Glossy Accents... this time, I let them stay.  They add to the champagne effect!

Thanks for stopping by - and thank you for the inspiration, Julie!
Lisa

Supplies:

Tuesday, January 19, 2016

CardMaker and May Arts Blog Hop

Hello everyone!  Thanks for joining me today for the CardMaker Magazine blog team and May Arts Blog hop, featuring Valentine's Day cards.  I'm very excited to be joining a very talented list of artists and have two projects to share.

Today's projects are all about the ribbon!  My first card features three different ribbons for maximum texture.


Love:

  1. Trim a card panel to 4" x 5.25" from 80# Neenah Solar White cardstock
  2. Die cut a heart into the panel * I centered it and placed closer to the top of the panel.
  3. Create a top-folding card from 110# Neenah Solar White cardstock with a finished size of 4.25" x 5.5"
  4. Place the heart-opening card panel on the card base and mark lightly the opening with a pencil
  5. Adhere strips of ribbon on the card base to cover the area of the heart window  * I alternated the glitter and rosette ribbons and did not go all the way to the edge of the card base.
  6. Add a double layer of foam tape to the card panel around the heart opening.  Place on the card base.
  7. Die cut "love" sentiment and snip the word from the heart frame to remove. Adhere to the front.
  8. Embellish with one red sequin heart (bonus - it has adhesive on the back!)
Because this has a bit of bulk, it will either require extra postage or will need to be hand delivered.


X's & O's:

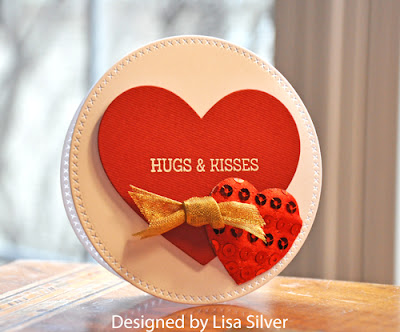
My second card is a small round card and came together quickly.  I plan to make a few more to tuck into lunches.
  1. Die cut two circles from the Cross-Stitched Circles by MFT (here are my X's and O's!) from 110# Neenah Solar White cardstock
  2. Score one of the circles at 0.5" and add a strong adhesive to this portion.  Secure to the other circle to form the card base
  3. Die cut a heart from red cardstock
  4. Prep the heart with an anti-static tool and stamp with "HUGS & KISSES" sentiment with Versamark ink.  Cover with white embossing powder and heat set
  5. Adhere the heart to the card base with foam tape
  6. Embellish with a red sequin, self-adhesive heart
  7. Knot a small amount of gold sheer ribbon and adhere with a glue dot to complete the card


Thanks for visiting today.  All my supplies and ribbons provided to me are listed below.  Affiliate links are used below where possible.  


Supplies:


Wednesday, January 13, 2016

U Inspire Me Post - You're My Favorite

Hello!  I would love it if you checked out my post today on the CardMaker blog --> HERE <-- to see the details about this project and what inspired me to create.


Inspiration abounds all around us.  Where do you find your creative spark?  Other blogs, Pinterest, magazines, home decor, or fashion?

I'd love to hear from you.

Thanks for stopping by,
Lisa

Monday, January 4, 2016

Exciting News!

Hello!  I'm so excited to be sharing this news!  I was asked to join the CardMaker Magazine Blog team for the first half of the year.  We'll be creating up a storm, so be sure to follow the CardMaker Magazine Blog for our weekly posts.

I'd love it if you checked out the other ladies on the team.  They are all very talented and I'm looking forward to our collaboration over the next several months.


Thank you for visiting!
Lisa