Within the next 15 minutes, I'm heading out the door for a trip to Italy. It's work related and I won't get a ton of free time... but exciting still the same.
I'll have a post for you later this week that you won't want to miss!
If you're looking for great project ideas in the meantime, head over to the CHF Forum and Gallery! The link is on my sidebar.
Thanks and see you soon,
Lisa
Sunday, September 30, 2007
Saturday, September 29, 2007
Another Angel
This angel is really sweet. I had stamped two when I made my CPS card and thought I'd better put her to good use. With the same color pallette, I created this card:

The addition of the simple stamped gingham ribbon and the sentiment complete the card. I kept it simple.. the angel is just pretty on her own, don't you think?
Thanks for stopping by,
Lisa
=========================
Supplies:
Stamps: Angel by Karen Lockhart from Ellen Hutson's store , CHF Ribbons, Short and Sweet by Stampin' Up!
Stamps: Angel by Karen Lockhart from Ellen Hutson's store , CHF Ribbons, Short and Sweet by Stampin' Up!
Ink: Pitchblack by Adirondack, Sahara Sand, Old Olive
Paper: Certainly celery, Barely Banana, white cardstock, Basic Grey Fruitcake Snowed In designer paper
Embellishments: piercing tool and mat pack, green marker, Copic markers (Y000-Pale Lemon, Y11-pale Lemon, Y15-Cadmium Yellow, Y19-Napoli Yellow, G21-Lime Green, G28-Ocean Green, G40-Dim Green, R27-Cadmium Red), spica glitter pens.
Friday, September 28, 2007
Snow Globe Christmas
I had a previous card posted with the 2007 Lockhart Snow Globe and loved it so much, I went in search of other snow globe. I was lucky enough to find that Ellen had one from 2006. The images are SO sweet...
This is a quick card that I did, based on Basic Grey's Fruitcake Plaid designer series paper. Doesn't it remind you of a fuzzy scarf or coat? My grandpa loves flannel jackets and shirts in the winter. That's the fuzzy kind of hug I'm picturing here!
This is a quick card that I did, based on Basic Grey's Fruitcake Plaid designer series paper. Doesn't it remind you of a fuzzy scarf or coat? My grandpa loves flannel jackets and shirts in the winter. That's the fuzzy kind of hug I'm picturing here!
 I colored my snow family with copics that matched the designer paper. Wrapped the image with twill tape and a bit of copper hardware complete the design. I'll add a sentiment later... I would really love to have a stamp that said - "from our family to yours". I may just print from the PC and add.
Thanks for looking,
Lisa
-------------------------------------
Supplies:
Stamps: Snow Globe by Karen Lockhart from Ellen Hutson's store
Ink: Adirondack Pitchblack, Creamy Caramel, Close to Cocoa
Paper: Basic Grey Fruitcake paper (Plaid), Ruby Red, Close to Cocoa
Embellishments: Twill tape, ticket corner punch, copper brads and hardware, Copic markers (R14-Light Rouge, R27-Cadmium Red, G99-Olive, YG95-Pale Olive, B00-Frost Blue, Y11-Pale Lemon, Y15-Cadmium Yellow, E31-Brick beige, E27-Africano), Spica glitter pens.
Thursday, September 27, 2007
CPS #31 and a Tease!
I love a good challenge... and a sketch challenge has always been a favorite of mine. I saw a sketch on CPS # 31 (Card Positioning Systems blog) that really spoke to me. It's a unique sketch...
Here's my take on the design:
 I colored her with copic markers and highlighted the details with Copic Spica glitter pens. Something a little extra on this card was the stitching - first the white twill with a zig-zag stitch down the middle and the straight stitching around the angel.
Here's my take on the design:
 This isn't a classical holiday color theme... but I think the Basic Grey Fruitcake (Snowed In) double sided paper is a perfect foil for the sweet Lockhart angel. Isn't she beautiful?
Here's close up of her detail:
I colored her with copic markers and highlighted the details with Copic Spica glitter pens. Something a little extra on this card was the stitching - first the white twill with a zig-zag stitch down the middle and the straight stitching around the angel.This was fun! I'll have to check out the CPS sketches more often!
************************************************************
And... not to forget the best part... CHF will be releasing new sets next week. Stay tuned to the Design Team blogs (see my sidebar) for details and sneak peeks this week. I hear there will be PRIZES! Whohoo!!!! Just you wait until you see the amazing things the newest illustrator at CHF has been whipping up! I'll update you with more soon...
************************************************************
Thanks for stopping by,
Lisa
--------------------------------------------------------------------
Supplies:
Stamps: Angel by Karen Lockhart from Ellen Hutson's store
Ink: Pitchblack by Adirondack, Sahara Sand
Paper: Certainly celery, Barely Banana, white cardstock, Basic Grey Fruitcake Snowed In designer paper
Embellishments: white twill, sewing machine and thread, Copic markers (Y000-Pale Lemon, Y11-pale Lemon, Y15-Cadmium Yellow, Y19-Napoli Yellow, G21-Lime Green, G28-Ocean Green, G40-Dim Green, R27-Cadmium Red), spica glitter pens.
Wednesday, September 26, 2007
Heirloom Daisy Jar
I had to share this card with you. I also posted this on my CHF gallery. I would encourage anyone who is using CHF stamps to check this out. There are SO many great ideas! The forum is also ever-growing, with techniques outlined, challenges, and suggestions for the wonderful Thomas Kinkade images. I've added the links to my side bar...
OK... so back to this post. Every once in awhile, I'm REALLY happy with a creation. This is one of those times.
 The jumping point for me was the Daisy D's Heirloom Swatches mini papers, that I bought with an online retailer. It's just luscious! The colors were calling to me!!!
OK... so back to this post. Every once in awhile, I'm REALLY happy with a creation. This is one of those times.
The jumping point for me was the Daisy D's Heirloom Swatches mini papers, that I bought with an online retailer. It's just luscious! The colors were calling to me!!!I stamped the Daisy jar in Coffee Bean Brilliance ink and heat set, before coloring with Copic markers. The flowers were colored in muted reds and browns to mirror the designer paper. I stitched the cheesecloth tan panel to the designer paper, added brads and hardware to complete the project. The tan panel almost has a leather look to it, which pairs with the rich fall colors.
I was SO happy with how this completed. It's not an everyday occurance to me, but I'm thrilled!
Thanks for stopping by~
Lisa
----------------------------------
Supplies:
Stamps: Daisy Jar, Cheesecloth Backgrounder, Birthday Wishes
Ink: Brilliance Coffee Bean ink, tan, brown
Paper: Daisy D's Heirloom Swatches Mini pack, tan, grey green, and White cardstock
Embellishments: aged copper brads and hardware window, dimensional tape, thread & sewing machine, Copic markers (R14-Light Rouge, R27-Cadmium Red, BG09-Blue Green, E31-Brick Beige, E37-Sepia, E47-Dark Brown, BG93-Green Gray, G28-Ocean Green, W1-Warm Gray), and sponges
Tuesday, September 25, 2007
Simple Daisy Jar
I really love the Cheesecloth backgrounder. I paired this simple, but textural background with a really beautiful image drawn by Asela Hopkins.
 The colors are not your usual daisy... but I was inspired by a designer paper. I created a second card, which I'll share with you in another post. The rich colors, reminiscent of Autumn, were calling to me...
Here's a close-up of the daisies. I colored them with my Copic markers:
The colors are not your usual daisy... but I was inspired by a designer paper. I created a second card, which I'll share with you in another post. The rich colors, reminiscent of Autumn, were calling to me...Here's a close-up of the daisies. I colored them with my Copic markers:
 I kept this card very simple to highlight the beautiful Cheesecloth backgrounder and the daisies. The sentiment can be added later - or inside. Let me know what you think...
Thanks for looking,
Lisa
---------------------------
Supplies:
Stamps - All CHF: Cheesecloth backgrounder, Daisy Jar
Ink: Adirondack Pitchblack, tan, brown
Paper: Muted Red, Dark Brown, Teal, White
Embellishments: twill tape, teal grosgrain ribbon, dimensional tape, corner punch, thread & sewing machine, Copic markers (R14-Light Rouge, R27-Cadmium Red, BG09-Blue Green, E31-Brick Beige, E37-Sepia, E47-Dark Brown, BG93-Green Gray, G28-Ocean Green, W1-Warm Gray), and sponges
Monday, September 24, 2007
CHF Backgrounders
I thought I'd dedicate a post to the new backgrounders available from CHF. I love to use the CHF backgrounders because they are detailed, stamp beautifully, and make such a wonderful designer paper.
Lisa Strahl, CHF's Design Team coordinator, is the vision behind this latest release. She wrote an article on her blog about making dreams happen... since this has been her dream. I'm just thrilled to be a part of it.
The September Backgrounder release includes:


 Tulle
Tulle Woodgrain
 All the links are active to the store if you'd like to see more details.
 I'm sure all of you have dreams. I'd love to hear about something you've always wanted to do. There is nothing more exciting than seeing vision come to life!
Thanks,
Lisa
Sunday, September 23, 2007
Irises... Take Two
Hi again! I thought I'd try to alter the card I pictured below to see if I could improve it...
 I'm happier with this version. It's not an overly detailed card, but I think the central image can lend to a simple card.
 I stamped the image in Versamark and embossed with black detail. I watercolored the image with my crayons and highlighted with the white gel pen. I sponged light purple ink around the image, the notecard edge and around the sentiment (part of the Birthday Wishes sentiment also from CHF). I kept the purple velvet ribbon on this one... but I think it works.
Ultimately, I decided to remove the velvet ribbon. I think this simpler version works better for me... so I thought I'd share it with you.
I'm happier with this version. It's not an overly detailed card, but I think the central image can lend to a simple card.To test this theory, I used the same CHF Irises on a simple Arturo notecard.
I stamped the image in Versamark and embossed with black detail. I watercolored the image with my crayons and highlighted with the white gel pen. I sponged light purple ink around the image, the notecard edge and around the sentiment (part of the Birthday Wishes sentiment also from CHF). I kept the purple velvet ribbon on this one... but I think it works.Thanks for stopping by~
Lisa
Saturday, September 22, 2007
Something Different
I meant to post this on Friday, but boy was my evening crazy. So, you're getting a post tonight instead...
I have been creating with my Cornish Heritage Farms images all week and had to share this one with you. It's a slight diversion from what I have been posting, because this is clearly a "girly" card. I went for the Rice Paper backgrounder again - and it was a perfect pairing with the simple image. I love the texture this backgrounder gives to a card.

I have been creating with my Cornish Heritage Farms images all week and had to share this one with you. It's a slight diversion from what I have been posting, because this is clearly a "girly" card. I went for the Rice Paper backgrounder again - and it was a perfect pairing with the simple image. I love the texture this backgrounder gives to a card.
 See... it's a girly card, isn't it? Purple isn't my usual go-to color either, but it's hard not to pair the irises with anything other than a blue-purple color, in my opinion. I'm sure there are other colors of irises... this is just the color my grandmother's irises were.
I've included a close-up of the central image. I colored with copic markers and highlighted with a white gel pen. I love how vibrant they colored. I'm completely in love with my small stash of copics. Now to expand... just don't mention it to my husband.
I may rip this card apart and try again though. The ribbon seems out of place to me. Anyone have an opinion? If I recreate this one, I'll repost it.
Thanks for stopping by,
Lisa
++++++++++++++++++++++++
Supplies:
Stamps - all by CHF: Irises, Rice Paper backgrounder, Birthday Wishes
Paper (finished card size is 4"x7"): lavendar, medium purple, grey, white cardstock
Ink: Pitchblack Adirondack, medium purple for large panel
Embellishments: silver brads, grey velvet ribbon, paper snips (to distress edges), dimensional tape.
Thursday, September 20, 2007
Snowy Night
CHF stamps are amazing. They are often very detailed, which isn't the easiest thing to create when translating to rubber stamps. I'm so impressed with how clearly their images stamp.
This card is a perfect example of that detail. The snowflake I used is so intricate... truly what a snowflake looks like when it lands on the windowsill. *sigh* It's hard to be thinking of snow when it was 90F in St. Louis today...
This card is a perfect example of that detail. The snowflake I used is so intricate... truly what a snowflake looks like when it lands on the windowsill. *sigh* It's hard to be thinking of snow when it was 90F in St. Louis today...
 The central image is a white chalk ink on navy cardstock. The stamp image does hold up to embossing, but I was looking for a more transparent color, in this case. I also should mention that I stamped the ribbon again from the CHF Ribbon set. I really love that set. I'll never lack for the right shade of ribbon. LOL!
Thanks for looking,
Lisa
+++++++++++++++++++++++++++++
Supplies:
Stamps: Snowflake #1, Ribbons, Wishing You (Christmas sentiment)
Paper: blue-grey, navy, red, and white cardstock
Ink: blue-grey, navy, and red dye inks; white fluid chalk ink
Embellishments: silver brads, paper snips, dimensional tape
Wednesday, September 19, 2007
Sunny Days
This Cornish Heritage Farm Apple Tree image was a must-have for me... I saw this beautiful tree and knew I'd buy it immediately. It's an image that can be used for a scrapbook page on an apple-picking outing, a seasonal card to say you're thinking of someone, or a masculine (non-floral) image.
The card also uses another of CHF's new backgrounder stamps - Cheesecloth. It's a great neutral background and makes a textural impact on a relatively simple cardfront.
Thanks for stopping by!
Lisa
++++++++++++++++++++++++++
Stamps - all CHF - product names are active links to find on the CHF website: Apple Tree, Sunny Days sentiment, and Cheesecloth backgrounder (NEW)
Paper: Grass green, blue-green, and white cardstock
Ink: Adirondack Pitchblack ink by Ranger, Blue-green ink (to sponge), Grass Green, Copic Sketch markers (G40-Dim Green, YG17-Grass Green, B00-Frost Blue, E27-Africano, E31-Brick Beige, R29-Lipstick red, C5-Cool Gray, 0-blender)
Embellishments: stitched ribbon, silver brads, sponges, dimensional tape
The card also uses another of CHF's new backgrounder stamps - Cheesecloth. It's a great neutral background and makes a textural impact on a relatively simple cardfront.
 The card is fairly simple, but what is different about this card is that the green panel is the window to the Apple Tree image. It's popped up on dimensionals from the cardfront / main image.
Here's a close-up of the tree:
Thanks for stopping by!
Lisa
++++++++++++++++++++++++++
Stamps - all CHF - product names are active links to find on the CHF website: Apple Tree, Sunny Days sentiment, and Cheesecloth backgrounder (NEW)
Paper: Grass green, blue-green, and white cardstock
Ink: Adirondack Pitchblack ink by Ranger, Blue-green ink (to sponge), Grass Green, Copic Sketch markers (G40-Dim Green, YG17-Grass Green, B00-Frost Blue, E27-Africano, E31-Brick Beige, R29-Lipstick red, C5-Cool Gray, 0-blender)
Embellishments: stitched ribbon, silver brads, sponges, dimensional tape
Tuesday, September 18, 2007
CHF Stalkers!!!!
Big News!!! Rather than wait until Thursday for the Backgrounder release, Cornish Heritage Farms will be releasing them tonight (I believe after midnight)!!!
Be sure to check out their website for the latest backgrounders to the collection!
Thanks!
Lisa
Be sure to check out their website for the latest backgrounders to the collection!
Thanks!
Lisa
Cardinal Christmas
I make a ton of Christmas cards every year - at least 100 to send to friends and family. But it's been a habit of mine to make special ones for my Mom & Dad, my grandparents and a few people at work. I'd toss this card into that category. It's more detailed than a mass-produced card, clearly special and would more than likely be saved... that's usually my criteria anyway! LOL!

Another fun detail to this card is the stamped gingham ribbon. This makes it very easy for me to match my project, since I can use any of my inks. The Ribbons set is all on one sheet with 10 different ribbon options. There are two widths of gingham and grosgrain, three rick-rack varieties, and three awareness ribbons. The set was one of the first ones I had to purchase from CHF and know that this will be a long-time favorite.
Here's a close-up of the Cardinal (see a trend with me??? I love this cardinal):

Even with that said, the card was actually a fairly quick one to put together. Trust me!
The key to quick... the Pines and Needles Backgrounder by Cornish Heritage Farms. I was able to stamp a very detailed designer paper with this backgrounder in minutes and can do this multiple times in an assembly line fashion, if I need to make several cards.
The Pines and Needles backgrounder isn't a new one to the CHF catalog, just one that is Perfect for holiday cards - or the ever elusive masculine card! LOL! But, I think the main point of this post today is another backgrounder that is easy to use and versatile.
Another fun detail to this card is the stamped gingham ribbon. This makes it very easy for me to match my project, since I can use any of my inks. The Ribbons set is all on one sheet with 10 different ribbon options. There are two widths of gingham and grosgrain, three rick-rack varieties, and three awareness ribbons. The set was one of the first ones I had to purchase from CHF and know that this will be a long-time favorite.
Here's a close-up of the Cardinal (see a trend with me??? I love this cardinal):
I trimmed around the edges of the leaves and cardinal to expand the image beyond the matte. I think this gives the illusion of this being a part of the background itself. I used linen thread to sew some details to the card. The Pines and Needles background paper is adhered with dimensional tape for added depth.
Thanks for stopping by,
Lisa
+++++++++++++++++++
Supplies:
Stamps - All CHF: Cardinal, Pine Needles & Cones Backgrounder, Ribbons (incl. Awareness), Wishing You... (Christmas sentiment)
Paper: Olive, Craft brown, brown and white cardstocks
Ink: Pitchblack Adirondack by Ranger, Chesnut Roan Colorbox Queue Fluid Chalk Ink, Muted red dye ink (for stamped ribbon), Copic Sketch markers (R29-Lipstick red, R59-Cardinal, E27-Africano, E47-Dark Brown, G21-Lime Green, G99-Olive)
Embellishments: Dimensional tape, linen thread and needle, precision paper snips (to trim around main image)
Monday, September 17, 2007
New CHF Backgrounder
To continue on the discussion of background stamps, I have a card I created with a new background stamp by Cornish Heritage Farms! I think CHF has some of the most amazing and unique backgrounders. And they are expanding their offering!!!
The new release of 8 Backgrounders is slated for this Thursday... and you don't want to miss out! I created this card with the new Cracked Earth Backgrounder. The card has a truly masculine feel to the design and will make a great card for a male co-worker later this month. I personally struggle with cards for men. It's easy enough to find "girly images". That's where I think this backgrounder makes a versatile choice and I love how this completed.
Thanks for stopping by,
Lisa
The new release of 8 Backgrounders is slated for this Thursday... and you don't want to miss out!
I created this card with the new Cracked Earth Backgrounder. The card has a truly masculine feel to the design and will make a great card for a male co-worker later this month. I personally struggle with cards for men. It's easy enough to find "girly images". That's where I think this backgrounder makes a versatile choice and I love how this completed.Stick around this week for more sneak peeks...
+++++++++++++++++++++++++++++
Supplies:
Stamps: Cracked Earth Backgrounder (new!), Cardinal, Birthday Wishes
Paper: White, brown, black and muted red cardstock
Ink: Adirondack Pitchblack by Ranger, Dark brown, Creamy Brown and Chestnut Roan by Colorbox Queue Fluid Chalk inks, Copic Sketch markers (R29-Lipstick red, R59-Cardinal, E27-Africano, E47-Dark Brown, G21-Lime Green, G99-Olive)
Embellishments: gingham ribbon, aged copper brads, sponges, corner punch
+++++++++++++++++++++++++++++
Thanks for stopping by,
Lisa
Sunday, September 16, 2007
Jolly Holly Christmas
I've seen this written on a few forums and blogs that the use of Background stamps seem to be disappearing. Many of the comments to this assertion have always come down to one thing... if the background is versatile and unique, they will always be essential to cardmakers.
When I saw the Rice Paper Backgrounder, I thought it reminded me of a crocheted sweater or scarf. Talk about versatility!!! I created the background image with a shimmery spectrum pad (Brilliance Peacock) for a variegated "yarn" look.
 Here are the steps to make this card:
 Thanks for stopping by,
Lisa
I have always enjoyed using background stamps. I love using designer paper, but can often be frustrated when I can't find the right color or theme (or tone). That's where I think background stamps are essential. Depending on what you want to create, you'll have ink that matches and can stamp the right balance with your central image.
I have a few cards this week that will highlight the versatility of Background stamps.
The first card is a Christmas card, made with Cornish Heritage Farms stamps:
When I saw the Rice Paper Backgrounder, I thought it reminded me of a crocheted sweater or scarf. Talk about versatility!!! I created the background image with a shimmery spectrum pad (Brilliance Peacock) for a variegated "yarn" look.
Here are the steps to make this card:- Ink the Rice Paper backgrounder with Brilliance Peacock spectrum pigment ink and stamp on white cardstock twice.
- Stamp Jolly Holly snowman on white cardstock and again on one of the Rice Paper image.
- Carefully trim the gloves, scarf, and hat from the Rice Paper snowman.
- Adhere these pieces to the snowman stamped on white cardstock.
- Color image with Copic markers and highlight the gloves, scarf and hat.
- Matte image.
- Stamp sentiment on background paper.
- Faux stitch and embellish with twill tape.
- Add a finishing touch with Liquid Applique and heat to "fluff".
Here's a close-up of the paper-piecing:
Thanks for stopping by,Lisa
Want to see something funny?
Yep... that's right... I think it's hilarious! I got my haircut on Saturday and my hairdresser (is that what they're still called?) straightened my hair!!!
It's SO funny to me. I look weird!
It's SO funny to me. I look weird!
 I've always had curly hair and never really been able to blow it out. I look like a brillo pad when I attempt it myself. I've gotten used to having curls and love my product.
Well... I swear to have a card post later today. In fact, CHF has a sneak peek for you this week just prior to a release this week. Stay tuned! There are wonderful things to come!
Thanks for humoring me,
lise
Friday, September 14, 2007
Lizzie Anne Jolie Fleurs
I made a second card similar to the pink version I previously posted... because I love this set just that much. This was a card that I submitted for the All That Scraps DT call and thought I'd share with you today. The team has yet to be announced. I don't know if I'll have a chance in this one, but I have to say that it's just fine either way. I had a wonderful afternoon of stamping to show for it, so I'll share what I created for you now that the call is complete.
 I am actually loving any combo with Creamy Caramel. I sense a rut! But to be honest, I like how it's a neutral addition to a card, without being overwhelming or overpowering. My mom inspired me with this color combo and I've loved it ever since! Thanks Mom!
The central image was stamped with my Adirondack pitch black ink and colored with copics. rather than reach for a designer paper, I stamped my own with this set and I love how it looks.
I've uploaded it to SCS as this card, in case you're interested in the recipe: {thank you}
Thanks for stopping by,
Lisa
Thursday, September 13, 2007
My Favorite Things - Coffee
I had won a gift certificate from Julie Campbell - Stamped in His Image - as blog candy and had a chance to shop at Paper Pretties. I know... great give-away, wasn't it?!?! I purchased a stamp set that I'd been eyeing for quite some time. It's called Hot Stuff by My Favorite Things. These were my very quick cards for the set...

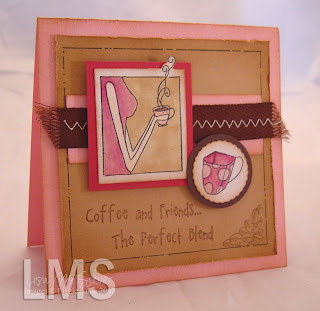
The images were smaller than I thought... but not a problem at all. I love to make small square cards. The central image (Kim's signature style is a truncated view of people doing their favorite things!) is colored with copic markers. I highlighted the coffee with glitter pens.
I think the fun part of these cards is the Creamy caramel matte. I used a micron pen to create a frame, mirroring the same one in the central image. It's fun! I'm really happy with these quick cards and know I'll be pulling this set out to make more fun cards in the future!
Both cards are in my gallery at SCS, if you'd like to see the full recipe of supplies - links active below:
Pink Card / Coffee and Friends...
Thanks for stopping by,
Lisa
Wednesday, September 12, 2007
Lockhart Snow Globe
I posted one card with this image earlier this week, but it's a stamp that is hard to resist for me. I love this sweet image.

This is another variation of my previous card - simpler. The card base is Always Artichoke and has the Dasher designer series paper by Basic Grey. The paper kits by BG come with punch out tags, which I used on this card. Some of Martha Stewart's taupe twill tape links the tag (which reminded me of the tails of their scarves). I colored the stamped image with my Copic markers, matching the Dasher paper. I didn't have the sentiment I wanted, so I'll print something off and add it later. I was thinking - "from our family to yours". A perfect fit, don't you think?
Thanks for stopping by,
Lisa
________________________
A quick update on my grandma again:
I had to a chance to visit with her this evening for a couple of hours. She's doing remarkably well and is just a bit bruised and sore. She was smiling and asking for her coffee (a good sign!). One thing that is sticking with me is something her surgeon told her today. The doctor said she is one lucky lady... that if they hadn't treated her when they had, she would have only had a couple of weeks. I'm so thankful... there are definitely angels amongst us.
Treasure the moments...
Tuesday, September 11, 2007
Nests... then birds...
I must have our feathered friends on my mind lately, because I have another card for you in that theme. I don't think I picked it knowingly... but here you go...
The card base (another square) is Bashful Blue. The central matte is white cardstock, stamped off with the Sanded background. I love this background, because it is SO versatile. I think in this case it can look like French country, verses a previous post of mine (Wanted SCS gallery / Wanted blog post) makes the image distressed.

I stamped the bird from Natural Beauty and colored with copic markers. The sentiment was stamped on barely banana cardstock and punched out with the Martha Stewart small scallop punch (which I bought at Michael's with my 40% off coupon - thank you!!!). I'd been only buying the ribbon or twill in that product line, but I caved when I realized the coupon works. But hey... for $6, the punch is a bargain in my mind!
The interesting part about the blue Matte behind the bird is how it was created. I colored a white piece of cardstock with B21-baby blue copic marker to fill the whole sheet. Then, with a small spray bottle (mini Ranger), I spritzed the image with isopropanol (IPA). The IPA splotched the alcohol ink and created a textured piece of paper, rather than a solid color. It was an experiment, but I think it worked and I loved the results. I think next time I may dab the paper while it's damp with IPA to "lift" the ink for a more intense result. I think if I had used the blender solution, it may have been more noticeable - but I haven't purchased the refill yet. Just a fun little experiment. I don't think the photo does this justice. You'll have to trust me in this! LOL!
Thanks for stopping by,
Lisa
p.s. I think this card is fitting for this update too... The sentiment I picked is So Happy...
My Grandma Audrey had her surgery today. The aneurysm was actually quite large and we are very blessed that it was found and treated. The procedure that was used was Coil Embolization, in case you were interested. I'm just thankful she'll be well and recovered soon. Thanks for all your kind words and prayers. It means a great deal to me.
Monday, September 10, 2007
Nested {thank you}
I created this card in multiple stages, but I'm really happy with this card. I think what I enjoy the most was the central image itself. I found this image at Hobby Lobby (it's an Inkadinkado stamp) that wasn't on sale. I didn't have a coupon. I could have waited until stamps were on sale... but I HAD to purchase it. I just did.
 I stamped the nest image on Georgia Pacific white cardstock in Pitch Black Adirondack ink and colored with various copic markers. To add a little dazzle (which didn't photograph well), I highlighted the image with Copic spica glitter pens. I trimmed the image and matted on Chocolate Chip cardstock - pierced first. I used my Coluzzle (still one of the best tools in town) to create my semi-circle and pierced it too. I sponged all the edges in Close to Cocoa.
Before I put all this on the Soft Sky card base, I used the color spritz tool and my Close to Cocoa marker to make the main card look like a Robin's egg (LOL!).
All in all, I loved how this completed. I'm glad I gave in to my impulse to purchase this stamp. It will be a favorite of mine for a long time.
Thanks for stopping by,
Lisa
ETA: My grandma was scheduled to have her brain surgery today for her aneurysm... but they had to cancel. The radiological equipment wasn't working properly (the software). We're scheduled again for tomorrow morning, so the waiting game begins again. It's so nerve wracking.
Sunday, September 9, 2007
Just Because We Wanna Challenge
Jeanne Streiff and Sherry Cheever are hosting a challenge... Just Because We Wanna. The theme today is Glitter. I love to use glitter to highlight an image.
This is the card I put together this afternoon.
 The card base is Soft Sky and the central matte is from the Dasher Basic Grey paper. I used the colors from the designer paper to color the Snow Globe image from Lockhart Stamps (such a sweet stamp!!!) with my Copic markers. I used the Fiskars circle template and razor cutting tool to cut out the Snow Globe, the soft sky ring, and to free form the pink swirl.
This is the card I put together this afternoon.
The card base is Soft Sky and the central matte is from the Dasher Basic Grey paper. I used the colors from the designer paper to color the Snow Globe image from Lockhart Stamps (such a sweet stamp!!!) with my Copic markers. I used the Fiskars circle template and razor cutting tool to cut out the Snow Globe, the soft sky ring, and to free form the pink swirl.The glitter comes to play in two places. I used the Copic spica glitter pens to highlight the Snow Globe image. To add more sparkle, I added glitter on the dots/rings on the designer series paper with a two-way glue pen and Martha Stewart's awesome crystal glitter.
This is a really fun and funky Christmas card - but I really LOVE it!
Thanks for looking,
Lisa
Saturday, September 8, 2007
CHF Submission
So, I've posted a couple of my creations below for the CHF design team call. I thought I'd capture another one here for you to see...
 This card was one a ton of fun to create. Here are the directions to make:
Directions:
1. Cut card base (6”x4” finished size) and “wood base” matte (3-7/8” square).
2. Stamp Pumpkin Wheelbarrow on White cardstock. Color with markers in lighter tones. Layer dimension with colored pencils.
3. Create Faux Wood background panel by rubbing White Craft ink on cardstock in long strokes. Heat set or allow to dry. Rub next color over cardstock (Close to Cocoa) to create wood grain. Add distressed edges and color spritz for aged look.
4. Add brads to wood panel. Adhere to card base.
5. Using the Coluzzle, cut central image and matte with oval template.
6. Adhere Ruby Red matte to card base.
7. Tie ribbon around card and adhere central image with dimensional tape.
8. Stamp sentiment and punch out with key tag punch. Trim edges and adhere to pumpkin pie key tag matte. Add jump ring and tie to ribbon with gold cord. Secure sentiment to the card with dimensional tape.
Thanks for looking!
Lisa
Friday, September 7, 2007
Stunned...
I had another post ready to go today with a card I recently finished... and felt that I should share this link with you instead. Lisa Strahl is continuing her articles on Design Team submissions. I say "stunned" because Lisa is featuring another one of my cards. In addition, two of Dawn Lusk's cards are outlined... and are truly stunning!!!
The post is called Thinking Outside the Box.
The card that is posted was Spring Window:
The post is called Thinking Outside the Box.
The card that is posted was Spring Window:
 Thanks for stopping by!
Lisa
Thursday, September 6, 2007
Humbling
It's been an exciting stamping week for me. One of the most exciting aspects to being a part of CHF's team is the access to it's talented stampers. I have much to learn. These ladies are amazing. I'm still a bit in awe of the situation and the people.
In conjunction with this, Lisa Strahl, CHF's Design Team Coordinator, is posting articles on her blog that address many of the questions we all have about design and design concepts - the very questions we all ask of our work when we are not offered DT positions. I've been down the road of rejection several times and have tried not to take things personally. But, I'm human and it still hurts.
I am completely humbled by Lisa's article today about Designing Dreams. The title is the active link.
Not only do I apppreciate the analysis of what makes a project work... I value that Lisa took this approach with one of my submission cards. It's humbling and I'm honored.

Thanks for stopping by,
Lisa
In conjunction with this, Lisa Strahl, CHF's Design Team Coordinator, is posting articles on her blog that address many of the questions we all have about design and design concepts - the very questions we all ask of our work when we are not offered DT positions. I've been down the road of rejection several times and have tried not to take things personally. But, I'm human and it still hurts.
I am completely humbled by Lisa's article today about Designing Dreams. The title is the active link.
Not only do I apppreciate the analysis of what makes a project work... I value that Lisa took this approach with one of my submission cards. It's humbling and I'm honored.
Thanks for stopping by,
Lisa
Wednesday, September 5, 2007
Star Wishes
I'm on a roll with the Gina K "Make a Wish" set. It's SO much fun!

The card base is Taken with Teal. The fabulous side panel was made on Glossy White cardstock with Ranger Alcohol inks for a marble effect. It's one of my first attempts... so not perfect. You should see some of the mess I made! LOL! The silver ink was everywhere! LOL!!!!
I stamped the cake with Pitch black Adirondack ink and colored with Copic markers. I had the list handy... but can't find my post-it. I'll update this when I find it. I also used the Spica glitter pens that I purchased from Ellen's store to highlight the candle, stars and the icing. It's an amazing way to add sparkle without the mess... and I had to off-set the mess from the silver ink. Haha!!! A quick addition of the Star punch by SU and a few silver brads (to mirror the silver in the panel) and the card is complete.
Fun card!!!
Thanks,
Lisa
ETA: Crystal mentioned in her comments that the quote was Batman! I'm SO surprised that anyone knew it. Thanks for posting, Crystal. I've left you a message to send me your snail mail. Even though it wasn't an official contest, I'd like to thank you for playing! LOL!
Rachel's Creations
I had to share these cards with you tonight. My daughter, Rachel, is 9... almost 10 (she reminds me). She is funny, sweet and creative.

She made two cards to give her friend and I thought I'd surprise her by posting them here...
Rachel made the cards in colored paper and colored the images with her watercolor pencils. She has a stack of her own supplies and stamps... Can I just say that I'm super proud of her!
Thanks for stopping by!
Lisa
Tuesday, September 4, 2007
Stop the Press!!! Who is that???
I still can't believe this... but I know it's true. I've seen it in print!
I've been selected as part of the Cornish Heritage Farms Fresh Faces Design Team!
***insert squealing, jumping giggles ***
The announcement was sent out by CHF in their newsletter and on Lisa Strahl's blog post HERE.
The following stampers will be joining the Cornish Heritage Farms Design Team:
Lesley Langdon - ON, Canada
Alli Miles - BC, Canada
Linda Abadie - South Korea
Amanda McIlhatton - N. Ireland
Lisa Silver - MO, USA
Anne Sanborn - NH, USA
Kristine Reynolds - CA, USA
Mary Anderson - NH, USA
Dawn Lusk - OH, USA
Lori Craig - MO, USA
I'm floored!
Anyway, thanks for stopping by! I can't wait to see what CHF has in store for us! I just love an adventure!
Lisa
p.s. Anyone recognize the Title above as a movie line? My cousin (who is easily 15 years younger than I) used to watch this movie every time I babysat him. I can still quote it in my sleep! No guesses... I'll keep you in suspense...
Make a Wish
I love creating with beautiful and fun stamps. The Make a Wish set by Gina K is just such a set.

This turned out to be a super fast card. I bought these dimensional star stickers by Paperbilities (Star Sticker Accents) at Walmart - and immediately thought of the Make a Wish set. Perfect foil for the stars in the set, don't you think?
The card base is Bordering Blue stamped with the shooting stars. The white matte was run through the Cuttlebug with the small square embossing folder. The other layers are Taken with Teal and Brilliant Blue. A quick run of two-way glue and glitter added some sparkle to the bottom of the card. Super fast and fun!!!
Thanks for stopping by,
Lisa
Monday, September 3, 2007
Daddy's Birthday
I'm Daddy's little girl... what can I say. I love my parents. I live close to them (same neighborhood), I call them all the time... they are a huge part of my life.
So, Dad celebrated his birthday on Sunday with a family BBQ. I made him this card, which turned out great. It's so masculine and rich in color... I really loved how it completed!
So, Dad celebrated his birthday on Sunday with a family BBQ. I made him this card, which turned out great. It's so masculine and rich in color... I really loved how it completed!
 The card base is Really Rust with the edged sponged with Close to Cocoa. I also used Ranger Distress ink (Walnut Stain) to age the layers edges. A strip of Outlaw designer paper, Creamy Caramel, and Close to Cocoa were faux stitched together for the matte. The medallion was embossed on Very vanilla cardstock with copper embossing powder, edges sponged with Close to Cocoa. The central image was stamped in Chocolate Chip. The Sanded Background was inked with Chocolate chip and kissed off before stamping over the Horse. More sponging and distressed edges finish off the project.
The "Wanted" set has been on my wish list since day one... and I'm glad I finally caved. It's a great set to make masculine cards.
Thanks for stopping by,
Lisa
Subscribe to:
Posts (Atom)