Thursday, May 2, 2013

Scor-Pal Mini Brag Book Tutorial

Hello.  It's Lisa today with a mini book project.  I have a friend that is expecting their first child and I know would love to have a way to brag on her little man.


Supplies:

Tools: Scor-Pal scoring board in inches, Scor-tool and Scor-Tape
Stamps: You Move Me stamps and dies by My Favorite Things and Memorable "Hello" Decorative Stamps by My Mind's Eye (Hello My Name Is image)
Ink: ColorBox Licorice and Cherry dye inks, Sea Crystal Fluid Chalk ink by Clearsnap
Paper: Kraft 80#, Pop-Tone Red Hot, Midnight Black 80# and Solar White by DiscountCardstock.com
Patterned Paper: Seen & Noted by Pebbles
Other: sequins from Etsy, washi tape, Velcro by 3M, Precision scissors, wet adhesive - Mono Multi by Tombo, T3 Copic Marker
Dies: You Move Me dies by My Favorite Things


So, let's get started.

STEP 1: Trim two pieces of cardstock for your Brag Book Base from Straw 80# cardstock:

4.25" x 11" and 4.25" x 10.5"

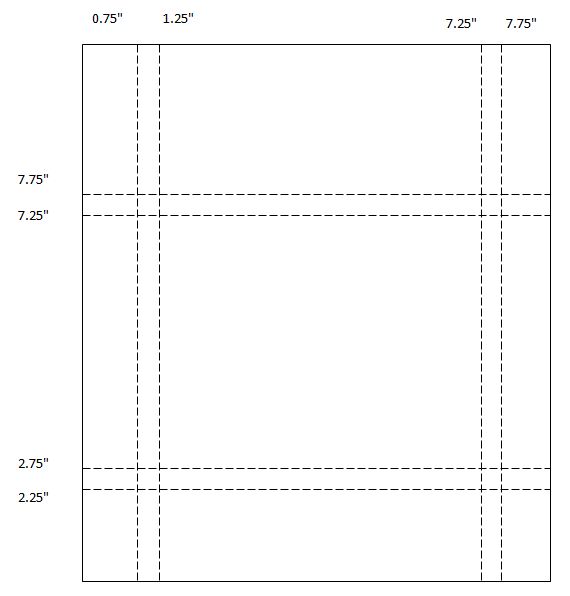
Score both pieces as outlined below in the template, using your Scor-Pal and Scor-Tool.  Only one of the pieces will have a small 0.5" flap on the end.


STEP 2: Add a strip of Scor-Tape to the 0.5" flap of your book base.


STEP 3: Align the edges and adhere the two pieces together to create a continuous accordion fold book base.


STEP 4: Here's the fun part!  Use patterned paper, die cuts, stamped images and embellishments to personalize the book base.  Because this project is intended as a brag book, leave plenty of open spaces to add photos or journaling.


STEP 5: Cut a strip of coordinating cardstock (2" x 8.5") to be a band around the brag book as a closure.  Score as outlined in the template below.


STEP 6: Add Scor-Tape to the end inner portion of the band to be adhered to the last page of the book.


STEP 7: Adhere to the last page, keeping in mind placement along the front of the book.

Add a small piece of Velcro (or a magnet) to opposite flap for easy opening.  After all, it's a brag book and the recipient will want to open often to share their joy!

Alternatively, you can create a static closure by making a "belly band" that slides on and off the book.


TIP: When aligning Velcro or magnetic closures, secure both pieces (hook / loop or positive / negative pieces) and adhere on the moving part of the flap - the part that you lift to open. In this example, this is the flap that is open and on the left side of the image above. Remove the adhesive backing for the other side of the closure. Gently align and close to ensure it's proper placement.

A view of the open brag book from the front is below.  The closure will remain with the book, but will not be a hindrance to enjoying the finished project.


Here's a view from the side:


A view from the back of the book:


Thank you for visiting today!
Lisa

Wednesday, May 1, 2013

Scor-Pal and SEI Cross-Promotional Week

Hello!  The Scor-Pal team and SEI are teaming up for a cross-promotional week! We will be sharing tutorials / projects all week and I hear there are great prizes in store. Every day, we will have multiple posts on the Scor-Pal blog.  The SEI blog is going to be sharing projects and prizes too!  Stop by the Scor-Pal blog for more details about how to win!

Without further ado, I have a project to share with you today, which I hope you will enjoy!

--------------------------------------------

I was inspired by a project that Cindy Lyles (StarLitStudio) posted several years ago.  You can find discussion and details of what she did HERE.

I'm completely up the challenge, and since Mother's Day is around the corner, I knew I'd make this for a special person in my life.

Supplies:
Tools: Scor-Pal scoring board in inches, Scor-Tool, Scor-Envi, Scor-tape
Patterned Paper: Think of Me Card Maker Paper Pack by SEI
Paper: Solar White by Neenah, Posh Bright Blue Dungaree, Pop-Ton Gundrop Green 100#, Pop-Tone Snow Cone 100# DiscountCardstock.com
Other: corner rounder, flower dies by My Favorite Things, sequins from Etsy, precision scissors, Velcro by 3M

So, let's begin!


Following the template below, score your box base at the noted marks using your Scor-Pal scoring board and Scor-Tool.


Remove portions to create a base as shown below.


Fold along all the score lines and add Scor-tape to close the sides.  You can opt to round all the corners.

 
Adhere the small flaps to the folded side first.  Remove the backing to the Scor-tape and close the sides.


 Add Velcro to close the box.


Cover the front flap of the box with beautiful SEI patterned papers.  Embellish as desired.


The mini box will hold 6 cards and 6 envelopes.  Create a set of lovely cards with SEI papers to match the theme and design of the project for a perfect and complete gift.


Using your Scor-Envi, score as directed on the tool for the 3" x 3" envelope.  This begins with a 5-3/4" square piece of paper with scores at 4-1/4" and 7-3/4" along both sides.


Thanks for visiting,
Lisa

Wednesday, March 13, 2013

Scor-Pal Tutorial - Shadow Box Card

Hello.  It's Lisa today with a shadow box project.  I found this lovely gem by Selma Stevenson on the Scor-Pal site and was inspired to try my hand at one.  Of course, while I'm at it, I thought I'd show you how easy it is to replicate the project too!


Supplies:

Tools: Scor-Pal scoring board in inches, Scor-tool and Scor-Tape
Stamps: Cover-a-card Gradation by Impression Obsession, "thanks" sentiment by Paper Smooches
Ink: Espresso Truffle and Desert Sand Memento dye inks by Tsukineko
Paper: Whip Cream Pop-Tone, Tangy Orange Pop-Tone and Hot Fudge Pop-Tone (all 100#), Straw 110# by DiscountCardstock.com
Other: Squeezed Lemonade, Mowed Grass, Ripe Persimmon and Fired Brick Distress inks, Glass Effects Gel in Crystal Clear and Ice White pearl pen by Viva Decor, Mister Huey's Calico White spray by Studio Calico, waterbrush by Niji
Dies: Labels 28 by Spellbinder, butterflies (Darla and Vivienne) and Honey blossom Sprig by Memory Box


So, let's get started.

STEP 1: Trim 2 x 5.5" squares from Straw cardstock.  Score along both sides as outlined below in the template, using your Scor-Pal and Scor-Tool.


STEP 2: Select a die and cut a window into one of the scored pieces of paper.

It's easiest to cut the window with the score marks in place, as you can visualize where the window should be placed.  Use repositionable tape (painter's tape is a favorite of mine) to hold your die in place.  Do this step before folding along the score lines so it will fit in your die cutting machine and be less likely to shift.


STEP 3: Fold along the score lines using your Scor-Tool to create your shadow box base.


STEP 4: Using the base of the card as your guide, trim a piece of cream cardstock to 3.25" x 5.25". 

Stamp an image on the piece.  Dry embossing or a tone-on-tone die cuts would also be lovely.


STEP 5: Die cut images to embellish your card.

The flower image was die cut from cream cardstock and various Distress Stains were used to color.  To make it easier to add color to the delicate die cut, leave the flower in place on the original piece of cardstock and add ink to color.  The butterfly base was die cut from orange cardstock.  To give the butterfly an ombre effect, I used Distress stains and a bit of water to blend.

Glass Effects were added over the entire floral image and the die-cut butterfly.  The edges will curl a bit, but it helps protect the delicate edges of the flower.

Other options are creating felt or paper flowers, stamped images or stickers.


STEP 6: Complete your card.  Stamp a sentiment to the background of your card.  Use the window front of the card to determine the best placement.

Adhere the top of the card base to the bottom with Scor-tape.  Add the embellishment die cuts.

Add sprays and dots of pearl pen to complete your card. 


Thank you for visiting today!
Lisa

Sunday, February 17, 2013

SCS Love Fest - Scor-Pal Challenge

Hello!  It's Love Fest at Splitcoaststampers and the day has finally arrived for the Scor-Pal Challenge.


The challenge is simple.... Flip, Flap or Oodles of Folds!  Grab your Scor-Pal scoring board and join in the fun.  You can find all the details about the challenge HERE.

For additional inspiration, check out the Scor-Pal blog HERE.

My pocket card is all about love...

love you


Of course, creating my own envelope was easy using a Scor-Envi.  In fact, this is box-envelope that will accomdate my very embellished finished card.

So - are you inspired to join in the Love Fest-ivities?  Hope to see you there!

Hugs,
lise


---------------------------------------------------------------------------------

Supplies:
Stamps: Simple Hearts by Gina K Designs (Illustrated by Tami Mayberry)
Paper:  Straw (110#), Whip Cream Pop-Tone and Solar White by DiscountCardstock.com, Distress and Spotted by Core'dinations |  Patterned Paper: Fourteen by Crate
Ink: Grey Flannel Memento dye ink by Tsukineko, ColorBox Red Barn Chalk ink by Clearsnap
Other: Scor-pal, Scor-Tape, Scor-Envi, Doily die by Cheery Lynn Designs, Corner rounder by Zutter, Baker's Twine, heart strip die by PTI, 1-3/8" and 2" circle punches by EK Success, precision scissors by EK Success, flowers by Prima Marketing, sanding block by Core'dinations
Technique: Pocket fold, distressing

Thursday, February 14, 2013

Splitcoaststampers Love Fest!


Hello!  Have you heard the news?  SCS is kicking off Love Fest today in the Member Forums and we'd love to have you join in the fun!  Be on the look-out for a Scor-Pal challenge in a couple days!

Sunday, February 10, 2013

Scor-Pal Tutorial - Perpetual Calendar

Hello!  It's Lisa today with details on how to create your own Perpetual Calendar with paper.

I was inspired by so many projects available on the web.  I've created altered wooden perpetual calendars in the past myself, but was intrigued with the idea of doing one entirely from paper.  I was inspired by two spectacular projects and designer's work.  Jamie Lane created a wonderful Advent Calendar with room to showcase a darling holiday image.  Cindy Lawrence designed an elegant countdown calendar.  Thank you ladies for your inspiration.

Oh Happy Day!

Supplies:
Tools: Scor-Pal Scoring board in inches, Scor-tool and Scor-tape
Ink: Brushed Corduroy Distress ink by Ranger
Paper: BoBunny Vintage Dot double sided papers (Burnt Orange and Ocean) 80# cardstock, Whipped Cream Pop-Tone Cardstock 100# and Hot Fudge Pop-Tone Cardstock 100# from DiscountCardstock.com
Other: hot glue gun, liquid glue, precision scissors, sponge, Spiral flower and Labels 28 dies by Spellbinder, number dies by My Favorite Things, Leaf die by Cheery Lynn Designs, letter dies by Papertrey Ink, corner rounder by Zutter

So, let's get started!


Step 1: Let's create two cubes for our numbers. 

Follow the template below to create your cubes.  Begin with a full sheet of cardstock and score with your Scor-Pal scoring board and Scor-tool as outlined below.  Carefully trim with a precision scissors all the shaded areas.
Here's my cube base, with the added Scor-tape on all the small flaps.

TIP: Round the corners of all the flaps to make it easier to assemble the cube. 


Fold your base to create your cube.


With your cubes complete, it's time to add your design flair!  The completed cubes measure 2.5".  Trim patterned paper to fit each side.  Adhere numbers to each side.


To make it easy for your project, this is how you'll need to number the sides in order to make it function for a month of days.

Block 1 numbers: 0, 1, 2, 3, 4, 5
Block 2 numbers: 0, 1, 2, 7, 8 and 9 (which will also function as your number 6)

Step 2: Now, let's create your calendar base.

Cut and score a piece of cardstock using the template below.
Add Scor-Tape to the 1/2" bottom flap and adhere at the  5-7/8" score mark.  This will create a triangulated base, which I find helps to keep your cubes on the base.


Cut and score the side panels as outlined in the template below.  Cut with your trimmer the shaded areas.  This piece will help add stability to your base as well as sides to hold the cubes in place.

Snip along the bottom to create flaps that can be adhered to the bottom of the base.


Add a bit of Scor-Tape to back of the base to adhere it to the side wrap panel.


Step 3: It's time to decorate your project!  Go wild!

I opted to create a project that can function as both a perpetual calendar, but also as a countdown calendar for special days like birthdays and anniversaries (or the last day of school).

But, the skies are the limit.  You could easily make a center section to your project that is magnetic with changeable panels for each holiday or month!


Thanks for stopping by and joining me today!
Lisa