Today's projects are all about the ribbon! My first card features three different ribbons for maximum texture.
Love:
- Trim a card panel to 4" x 5.25" from 80# Neenah Solar White cardstock
- Die cut a heart into the panel * I centered it and placed closer to the top of the panel.
- Create a top-folding card from 110# Neenah Solar White cardstock with a finished size of 4.25" x 5.5"
- Place the heart-opening card panel on the card base and mark lightly the opening with a pencil
- Adhere strips of ribbon on the card base to cover the area of the heart window * I alternated the glitter and rosette ribbons and did not go all the way to the edge of the card base.
- Add a double layer of foam tape to the card panel around the heart opening. Place on the card base.
- Die cut "love" sentiment and snip the word from the heart frame to remove. Adhere to the front.
- Embellish with one red sequin heart (bonus - it has adhesive on the back!)
X's & O's:
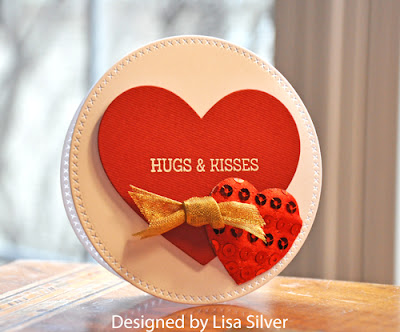
My second card is a small round card and came together quickly. I plan to make a few more to tuck into lunches.
- Die cut two circles from the Cross-Stitched Circles by MFT (here are my X's and O's!) from 110# Neenah Solar White cardstock
- Score one of the circles at 0.5" and add a strong adhesive to this portion. Secure to the other circle to form the card base
- Die cut a heart from red cardstock
- Prep the heart with an anti-static tool and stamp with "HUGS & KISSES" sentiment with Versamark ink. Cover with white embossing powder and heat set
- Adhere the heart to the card base with foam tape
- Embellish with a red sequin, self-adhesive heart
- Knot a small amount of gold sheer ribbon and adhere with a glue dot to complete the card
So, are you ready to hop?
No hop would be complete without prizes, of course! May Arts and the Ribbon Resource
will be giving 2 prizes of $25 gift cards to Ribbon
Resource.
- CardMaker
- Amy
Rysavy
- DeeDee
Catron
- Carisa
Zglobicki
- Gini
Williams Cagle
- Jenifer
Cowles
- Dawn Lusk
- Jennifer
Davey
- Karen
Baker
- Kim
Klinkovsky
- Karen Hanson
- Latrice
Murphy
- Linda Beeson
- Lori
Williams
- Michele Kosciolek
- Lisa
Silver <--- You are here!
- Rebecca VanDeMark
- Tami Mayberry
- Pamela Haskin
- Terri Burson
- Jen Shears
- Tracy
McLennon
- The Ribbon Resource
Thanks for visiting today. All my supplies and ribbons provided to me are listed below. Affiliate links are used below where possible.
Ribbons Used:
1.5 inch Red [Sequin] Adhesive Heart Ribbon (SKU: A478-15-14)
3/8 inch Red Glitter Velvet Ribbon (SKU: 377-38-14)
1.5 inch Red [Sequin] Adhesive Heart Ribbon (SKU: A478-15-14)
3/8 inch Red Glitter Velvet Ribbon (SKU: 377-38-14)
Supplies:


Love both of these cards, Lisa! I especially love how you layered the ribbons underneath the heart panel on the first one-so pretty!
ReplyDeleteI love the roses and the puffy hearts. Just lovely.
ReplyDeleteLove the roses on the first card, and the hugs and kisses card is so cute!
ReplyDeleteJust beautiful, Lisa!!
ReplyDeleteLovely cards! I especially like the round card - I'll have to give that a try.
ReplyDeleteoooohhh fun cards!! my fave is the first one!
ReplyDeleteSweet card with the rose ribbon that you made and the circle card has a nice texture on the edge border.
ReplyDeleteDELIGHTFUL cards Lisa!!!
ReplyDeleteLOVE your round card with the layered hearts, ADORE your flower-filled heart window and sequin heart card - WOW!!!
I like how you used these gorgeous ribbons.
ReplyDeleteGorgeous cards! The ribbon is fabulous!
ReplyDelete